Les utilisateurs de Windows et Linux seront heureux d’apprendre l’arrivée du Jailbreak iOS 7 RageBreak qui permet non seulement d’ouvrir l’accès au ROOT de l’iPhone, d’installer OpenSSH et d’installer Cydia.
Les utilisateurs de Mac peuvent suivre ce tutoriel. Le tutoriel est traduit à chaque étape en anglais suite à la demande d’utilisateurs 😉
Faites une sauvegarde de votre iPhone auparavant. Notez que ni Info iDevice ni moi-même ne pouvons être tenu responsable en cas de problème sur votre iDevice.
- avoir un iPhone 4 mis à jour en iOS 7.x [your iPhone 4 must running in iOS 7.x]
- Windows doit être installé sur votre PC ainsi que iTunes [Windows and iTunes must running on your computer]
- installez Linux (Install Ubuntu, Linux Mint, … on your PC) sur votre PC en dual boot, pour cela je vous conseille cette version : CLIQUEZ ICI
- installez ou mettez à jour Java sur Java.com
- téléchargez RageBreak [download RageBreak]
- télécharger Putty [download Putty]
- télécharger Winscp [download Winscp]
1- On démarre le tutoriel sur Windows [You should start in Windows for this tutorial]
2 -Dézippez le doosier RegaBreak sur votre bureau [Download and unzip win.zip file to your desktop]
3- Mettez votre iPhone en mode DFU [Put you phone into DFU mode]
4- Démarrez le fichier ssh_rd_rev04b.jar [Run the ssh_rd_rev04b.jar that is in the win folder you extracted]
5- Attendez que la fenêtre affiche “Succes …” et ne fermez pas la fenêtre ! [Wait for the tool to finish and do not close the tool !]

6- Démarrez Putty et connectez-vous en indiquant “localhost” et port “2022” [Open Putty .. Connect to localhost on port 2022]

7- le Terminal s’ouvre et demande « login as » , indiquez : root et pour le mot de passe : alpine [log in as: root Password: alpine]

8- Tapez la commande : mount.sh dans le Terminal de Putty et faites Entrée et laissez cette fenêtre ouverte [Type: mount.sh into PuTTy and hit Enter and leave this window open]
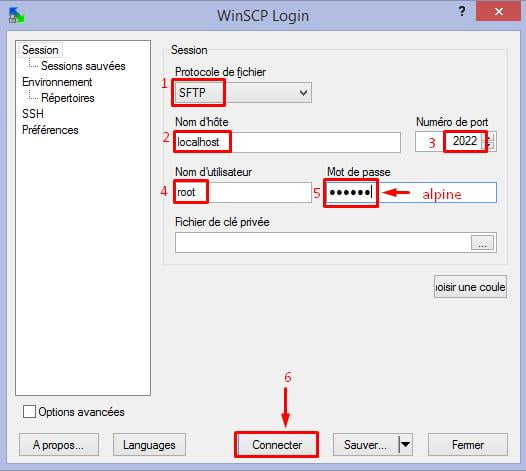
9- Démarrez Winscp et indiquez ce qui suit comme sur l’image … [Open Winscp and use the following settings :]
- SFTP
- Server: localhost
- Port : 2022
- Username: root
- Password: alpine

10- Cliquez sur Connecter et suivez la procédure de copie des fichier qui sont tous disponibles dans le dossier “Win” que vous avez dézippé sur votre bureau [Press connect and allow the fingerprint, All files needed are in the zip folder Win that you have unzip ont your desktop]
11- Copiez le fichier SSH2_bundle.tgz dans /mnt1/ [copy the SSH2_bundle.tgz file from pc to /mnt1/ on iphone]
12a- Copiez les fichiers gzip et tar dans /mnt1/bin/ [Then copy both files that are in the bin folder of you zip file (gzip and tar) to /mnt1/bin/ on the iphone]
12b- Copiez le dossier lib dans /private/var/ [copy lib folder to /private/var/ on the iphone]
13- Mettez les permissions des fichier gzip et tar en 0744 (clic-droit > propriétés) [Make sure the permissions are set to 0744 for both files (right click >properties)]
14- Copiez le fichier fstab dans /mnt1/private/etc/ et cliquez sur OUI pour écraser le fichier précédent [Copy fstab to /mnt1/private/etc/ and click yes to overwrite]
15- Copiez le fichier Services.plist dans /mnt1/System/Library/Lockdown/ et cliquez sur OUI pour écraser le fichier précédent [Copy Services.plist to /mnt1/System/Library/Lockdown/ and click yes to overwrite]
16- Fermez Winscp et retournez sur le Terminal de Putty pour tapez dans l’ordre les commandes ci-dessous [Now you can close Winscp, Go back to your Putty screen and enter the following commands] :
cd /mnt1
tar xzf SSH2_bundle.tgz
reboot_bak
17- Votre iPhone va s’éteindre et redémarrer en mode Recovery, pas de panique 😉 [Your phone will now turn off then back on to recovery mode, don’t panic !] Redémarrez votre PC pour passer sur Linux Ubuntu maintenant [Time to switch to Linux Ubuntu] 18- Mettez votre iPhone en mode DFU [Put your phone back into DFU mode]
19- Téléchargez à nouveau RageBreak et placez le fichier ragebreak.sh sur le bureau [Download RageBreak and put ragebreak.sh on your Desktop]
20- Ouvrez le Terminal sous Linux (Ctrl+Alt+T) et tapez les lignes de commandes ci-dessous en validant par la touche Entrée [Open a terminal (Ctrl+Alt+T) and type :]
sudo apt-get update
cd Bureau (cd Desktop for Ubuntu in English)
chmod +x RageBreak.sh
./RageBreak.sh
21- Tapez 1 puis Entrée [Type 1 and hit Enter]
22- Après l’installation choisissez l’option 2, 3 ou 4 selon le type d’iPhone 4 pour le Boot Tethered [ After it has finished installing choose the option which suits your phone 4 as it boots tethered ] :
- Tapez 2 pour iPhone 4 GSM (AT&T)
- Tapez 3 pour iPhone 4 RevA 8Go
- Tapez 4 pour iPhone 4 CMDA (Verizon …)
24- Dans Winscp indiquez :
- l’adresse IP
- le port 22
- Nom d’utilisateur : root
- Mot de passe : alpine
25- Une fois connecté tapez cette ligne de commande dans le terminal [Once you are SSH’d into the phone type the following]
wget -q -O /tmp/cyinstall-1.sh http://ragemasta.com/deb/cyinstall-1.sh && chmod 755 /tmp/cyinstall-1.sh && /tmp/cyinstall-1.sh

EDIT : suite au reboot , il est possible que des applications aient disparues, laissez votre iPhone allumé, les applications vont se remettre en place.
EDIT 2 : Lorsque vous ouvrez Cydia la première fois, choisissez “Développeur” afin d’afficher tous les paquets et installez “afc2add” ensuite vous ne rencontrerez pas de problème pour installer MobileTerminal ou iFile et surtout qu’ils apparaissent bien sur votre iPhone 😉
 Si vous rencontrez des problèmes, laissez moi un message dans les commentaires 😉 [If you have trouble with this How To, leave me a message in the comments]
Merci @ragemasta


